Click to see latest software crack

We daily update software zone,you can also mad request for software crack varsion.

Click to see about latest gadgets release

All latest gadgets news and it's classifications.

Click to see latest PC tricks

For make windows 7 fastest booting and know more about computers.

Click to see about Android

For Android rooting and latest popular android game and apps.

Click to see tricks for Windows phone

Get tricks for lumia,HTC and latest new for windows phone 8 update.

Showing posts with label pc tricks. Show all posts

Thursday, 15 August 2013

Shutdown Friends PC while chatting


You can shutdown your friend's computer through chatting. 
This is very simple and cool trick.

Kindly follow these steps :- 

Step 1: Before going to start clear all history, all cookies, stop all
downloading and close all extra tabs. Mean to say stop all internet
activities. Now go to your messenger and start chatting with the victim.

Step 2: Go the start and click on run.

Step 3: In run command type
cmd.exe
and hit enter.

Step 4: A black screen will appear. This is command prompt. In this box type
netstat -n


Step 5: Now if you done the step one correctly you see only one ip address many times (ip should be of victim). 

Step 6: Now again, type
shutdown -i
.A box will appear now click on add button.A small box will pop up. Now type ip address of computer which you get from "netstat -n" command.

Step 7: Now there are three options 
click on shutdown.

Step 8: To show a message to victim's computer check the "warm
users of the action" and set the number of seconds.

Step 9: Now select any option in shutdown event tracker.

Step 10: Now comes the best part of
the prank. In last type your message like you got hacked and we destroy your computer. After this shutdown
your computer is not going to start(type anything that scare your victim)
. Now click on ok and you are done

Thursday, 31 January 2013

HOW TO MAKE FOLDER PASSWORD PROTECTED AND INVISIBLE


Do you want to make a password protect folder??
Do you want to make it invisible??
So that it remains unnoticed by the normal users??

Well here is a way to do that. In this section I will show you how to make a password protected folder in Windows XP, Vista without using any additional software. Following is the step by step procedure to create a password protected folder.

STEP-1: Create a new folder (Right-click -> New -> Folder) and give it any name of your choice. For instance you name it as HME.

STEP-2:  Now place all the important files, documents or any other folder in this folder that you want to password protect.

STEP-3: Now Right-click on this folder (HME) and select the option Send To -> Compressed (zipped) Folder.

STEP-4: Now a new compressed zipped folder gets created next to folder (HME) with the same name.

STEP-5: Double-click on this compressed zipped folder and you should see your original folder (HME) there.

STEP-6: Now go to the File menu and select the option Add a password. ie: File -> Add a password

You will get small pop up window here. You can set your desired password. Once the password is set, It will ask for the password every time it is opened. Thus you have now created the password protected folder.

HOW TO MAKE IT INVISIBLE
STEP-1: Right-click on this password protected folder and click on Properties.

STEP-2: At the bottom select the option Hidden and press OK. Now your folder gets invisible.

STEP-3: In order to unhide this folder go to
My Computer – >Tools -> Folder options. Switch to View tab, scroll down and under Hidden files and folders you’ll see the following two options
  • Do not show hidden files and folders
  • Show hidden files and folders
Here you select the second option and press OK. Now the invisible folder becomes visible in it’s location. To access it you need the password. To make it invisible again repeat STEP-1 through STEP-3 and select the first option and click OK.
Now the folder becomes invisible once again.

Run Mobile Java Application On Computer


Method 1- Mpower player

The easiest and coolest free emulator for JAR / J2ME / MIDLET / MIDP on your PC/computer is mpowerplayer.
They even have an online emulator that you can use! It’s just a 1MB download for the emulator/player.

Downloadand Run MPowerPlayer for All OS!

Note: Only MIDP/j2me programs are allowed to run with these programs. Your mobile programs must to be have *.jar extension. For example MIG33.jar , asphalt_3_3d.jar etc. If you don’t see jar extension on your PC, then go to tools > folder options > view. In view tab you will see many options marked or unmarked. Look for the option “hide extensions for known file types”. Unmark it. Then click OK. Now you will able to see your all files extensions.


Method 2- SJ Boy Emulator

So far SJ Boy Emulator is the best too to run your jar softs, games on windows. It a little program designed for windows to run MIDP/CLDC programs easily without any problem.
This is the default window of SJ Boy Emulator which includes an N70 window. You can change this phone from skin toolbar which is located at the top of the window.
Now You are ready to run your Java/J2ME/Jar programs, softwares, games on it! What you need to do, just drag and drop your jar program on the window and then the program will run on the mobile just as real! You can use the mobile keypad to controll the program or game.
For example I am running mig33

DownloadSJ Boy Emulator

USE ANY ONE METHOD

How to disable/enable USB Port in Windows 7 ?


Hello All my Friends , I hope you Are visiting  my Website Daily For New  Tips , many people ask how to How To Disable / Enable Access Of USB Port  in school ,clg, sybercafe etc.   so Today I am showing  here how to How To Disable / Enable Access Of USB Port.  Just Fallow Simple  Steps And got Disable / Enable Access Of USB Port.

1)   windows Key


2) Type regedit  and press enter 


3) It will open the Registry Editor " click yes "

4) Find This HKEY_LOCAL_MACHINE 


5) Double Click on Defult Button 
After opening Registry edit browse the following path in reght side bar of registry editor
The Path to go: “HKEY_LOCAL_MACHINESYSTEMCurrentControlSetServicesUSBSTOR”
Step4: Then right click the registry “Start” which is rectangled in red color in the below screenshot of registry editor


6) then Right Click “Start” and Click modify
  • if u want To enable USB ports: change the value from “4? to “3?
  • if u want To disable USB ports: change the Value for “3? to “4?

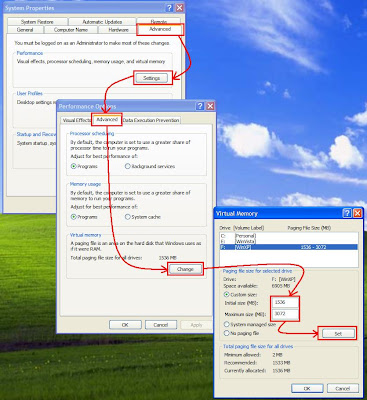
Increase Virtual RAM - To Make Your System Faster


https://blogger.googleusercontent.com/img/b/R29vZ2xl/AVvXsEg7a0klCnx3b3gOznMZptWIYw6_AUHtd2scj9m68jhIzH2mGBDvTq255vBlUsj7cpkvYjjJy-Rtpeqj701OO1cOAuXwGQkX7IQj5nbznb0qFyBYEXv1XVB7WiSeMbia0COz_JPoM4I-h_3t/s1600/windows-virtual-memory.jpg

Increase Virtual RAM - To Make Your System Faster

1) Hold down the 'Windows' Key and Press the 'Pause/Break' button at the top right of your keyboard.
Another way is Right-Clicking 'My Computer' and then Select 'Properties'.

http://iamkirtan.blogspot.in/  

 2) Click on the 'Advanced' tab.

(For Win 7 click on Advance System Setting)

3) 
Under 'Performance', click 'Settings'.

4) 
Then click the 'Advanced' tab on the button that pops up.

5) 
Under 'Virtual Memory' at the bottom, click 'Change'.

6) 
Click the 'Custom Size' button.

7) 
For the initial size (depending on your HD space), type in anywhere from 1000-1500 , and for the Maximum size type in anywhere from 2000-2500. 

8) Click 'Set', and then exit out of all of the windows.

9) 
Finally, Restart your computer.

10) 
You now have a faster computer and 1-2GB of Virtual RAM..! 

Speed your browser by changing your DNS


Most people use the default DNS settings provided by their ISP, and while they are usually sufficient for most purposes, there are plenty of free options out there, like OpenDNS and Google DNS. Namebench is a  free app that checks to see whether your current settings are optimized and, if not, which free option is best for you. Here's how to use it:

Download and install Namebench.

Fire it up and choose your settings. Keep the top two boxes checked. If you're concerned about network censorship, check the third box, and if you want to help the developers, check the last box. You can tweak the rest if you're outside U.S. or want to experiment with different browsers.


NameBench Dns

Click Start Benchmark and wait while Namebench runs its tests. It should take several minutes. A browser tab should pop open when Namebench is done and give you a list of DNS servers and how much faster they are than the one you're currently using, unless yours are already the fastest possible.

Namebench does not change your settings, but it's generally pretty easy to do it yourself. Check with the instructions you got from your ISP to set up your modem and/or router and just substitute the DNS addresses you received from Namebench for the addresses given by your ISP. It's best to do this with your router, as it will assign that DNS address for all the devices attached to it.

That's it! This can dramatically improve your browsing speed, and it's fairly easy to work through.